
They might not be the first thing you see when you walk into a room, but ceilings are a vital feature of every home. A run-down ceiling with water stains or cracks can stick out like a sore thumb.
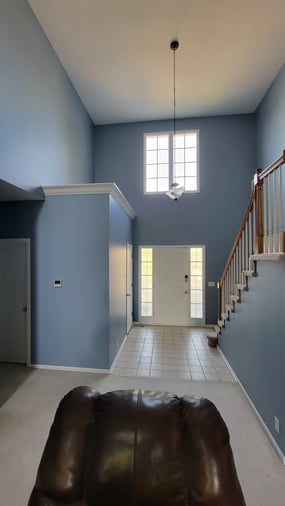
Luckily, a freshly painted and repaired ceiling brings value to your space.
No matter the driving force behind the need to paint your indoor ceilings, prep work is the first step to fresh and durable ceiling paint.
At Brush & Roll Painting in Omaha, NE, we transform homes to provide lasting and valuable paint work. We also strive to provide an excellent customer experience because having your ceiling painted should not be stressful and overwhelming.
In this article, we will discuss the prep work that goes into painting ceilings. We will also compare the prep work of painting ceilings to painting interior ceilings and walls. By reading this article, you will have a better understanding of what work you are paying for with interior ceiling painting.
Prep Work for Painting Ceilings
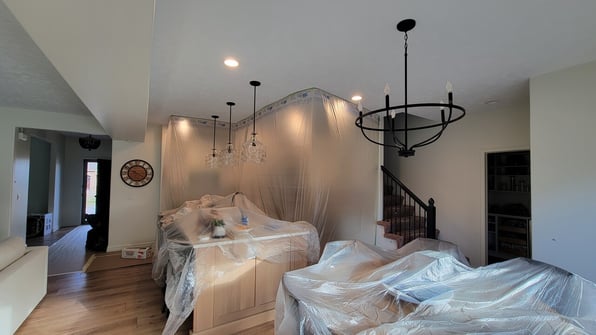
Painting the ceilings is more complex than painting the ceiling and the walls. The walls must be fully protected with tape and plastic from the ceiling paint. Painters must ensure that everything below the ceiling is protected from paint drips or splatters.
Drop cloths should cover the floor, and furniture should be protected.
Taping off walls for this purpose may come with some challenges. The main challenge is that the paint on the walls may peel off when the tape is removed. This can occur when the drywall tape was not correctly applied or there is access dust under the paint.
This process requires more time and materials, which can drive up the cost by double or triple the amount it would cost to paint the walls and ceilings.
Before painting the ceiling, any repairs should be taken care of; water stains must be repaired, and cracks must be filled with caulk.
Sometimes, sanding needs to be done on the ceiling, depending on if you want a change in the texture or want the texture entirely removed, like popcorn ceilings.
Prep Work for Painting Walls and Ceilings
There is much less prep work for painting ceilings when the walls will be painted as well. This is due to not needing to protect the walls from the ceiling paint.
In this process, the ceiling will be prepped and painted first. Drop cloths should cover the floor, and furniture should be protected.
Sanding and repairs with caulk should be done as needed. Then, the crew will move on to the walls, covering any imperfections from painting the ceiling.
They will also mask around edges that do not need to be painted, such as the trim and window sills, and remove and tape outlet covers and light switches.
How To Paint Ceilings

-
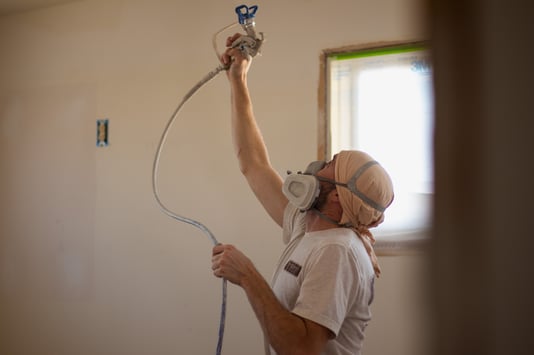
Cutting In: Painters start by "cutting in" the edges of the ceiling using a brush. This involves carefully painting along the perimeter of the ceiling where it meets the walls and any other edges that cannot be reached with a roller. Painter's tape may be used to create clean lines.
-
Applying Paint with a Roller: Once the edges are painted, painters use a roller to apply paint to the rest of the ceiling. They work in small sections, typically using a roller with an extension pole to reach high ceilings. The roller is dipped into the paint tray, ensuring it is evenly coated but not overloaded with paint.
-
Working in Sections: Painters typically divide the ceiling into manageable sections to ensure even coverage and avoid streaks or lap marks. They work methodically, rolling the paint onto the ceiling in overlapping strokes, moving from one end to the other.
-
Maintaining a Wet Edge: To prevent visible seams or lines where wet paint meets dry paint, painters carefully maintain a "wet edge" as they work. This means working quickly enough that the paint being applied overlaps slightly with the previously painted area.
-
Applying Additional Coats: Depending on the desired finish and the type of paint being used, painters may need to apply multiple coats of paint to achieve full coverage and depth of color. They allow each coat to dry completely before applying the next.
-
Checking for Uniformity: Once the paint has dried, painters inspect the ceiling for any missed spots, uneven areas, or imperfections. Touch-ups may be necessary to ensure a uniform finish.
-
Cleanup: After the painting is complete, painters carefully remove any painter's tape, clean their brushes and rollers, and dispose of any used materials properly. They also return furniture to its original position and remove drop cloths from the floor.
Conclusion
It is important to keep in mind that all painting contractors do not do these prep work tasks. Many painters don’t take the time to tape and plastic off areas. This leaves homeowners with uneven lines and paint splatters or drips.
To avoid this, be confident in your decision before you hire a painter. For an ultimate guide to hiring a painter, click the button below.

If you think Brush & Roll Painting may be a good painter for your project, schedule an estimate below. Our prep work process is typically 60-70% of the work that we do. This work helps guarantee a lasting paint job.

Topics:


-May-22-2026-01-56-32-9736-PM.png?width=800&height=418&name=Blog%20Post%20Image%20Size%20(1)-May-22-2026-01-56-32-9736-PM.png)


-May-15-2026-04-54-24-9954-PM.png?width=800&height=418&name=Blog%20Post%20Image%20Size%20(1)-May-15-2026-04-54-24-9954-PM.png)
-Sep-20-2024-01-43-26-0356-PM.png?width=800&height=418&name=Blog%20Post%20Image%20Size%20(2)-Sep-20-2024-01-43-26-0356-PM.png)


