.png?width=800&height=418&name=Untitled%20design%20(4).png)
Cabinet painting or refinishing is not an easy job by any means, it needs thorough prep work before painting in order to have lasting results. Without these steps, imperfections are guaranteed to show within a matter of months. When the wood starts to chip, it won’t stop until it’s properly fixed.
Fixing it calls for the cabinets to be completely refinished once again. So, it’s best to trust the process and products completely before making any decisions you might regret.
By doing research and asking contractors the right questions, you will gain confidence that your project will be done the proper way.
Cabinet refinishing is an investment in your daily life and your home. When thorough prep work is done and high-quality products are used, your newly refinished cabinets will add value while being able to withstand the daily use.
While some of these steps may seem like a no-brainer, it is often steps that get missed by some DIY painters and even painting companies. Many of them have a goal to get the project done as quickly as possible. This causes them to take shortcuts during the prep work and use low-quality products that are quick to apply.
At Brush & Roll Painting, we have been refinishing cabinets in the Omaha metro area since 1996. We know our thorough prep work process, use of high-quality products, and our 9-year warranty sets us apart from our competitors.
In this article, we will discuss the steps that are crucial for cabinet refinishing. By reading this, you will be able to know what steps your cabinets need if you are looking for a long-lasting finish.
Want to watch the process instead?
1. Prepare the Kitchen

Taking the time to lay drop cloths, mask edges, and cover up walls, countertops, and floors will prevent accidents and damage to other areas. If a contractor does not take the time to do this, they are trusting their steady hand, but they do not respect your space.
Spraying cabinets will require an extensive amount of prep work in comparison to brushing the cabinet boxes. However, masking and covering areas should still be done while brushing, to ensure clean lines and spotless spaces.
2. Remove Doors & Drawer Fronts
To practice thorough and detailed work, the cabinet doors must come off to seamlessly work on the boxes and the doors separately. This step is usually fairly quick and easy, so it should not be overlooked.
Cabinet doors need to be marked and hinges marked so everything goes back in the same place and ensure the doors will function properly.
Your cabinet refinishing company may take the doors back to their shop. Because cabinet doors and drawer fronts are what are most visible in your kitchen or bathroom, they need special attention.
At Brush & Roll Painting, we have a climate-controlled shop, equipped with space and materials to get your cabinets refinished properly.
Detail and thoroughness are key. It may be a red flag if a cabinet refinishing company asks to use your basement or garage, or doesn’t take off the doors and drawers.
3. Clean the Cabinets
Cleaning cabinets before anything is mandatory. Without it, it’s like using a dirty plate from the sink. The first layer of dirt causes harm to the original surface. Then to make matters worse, layers are applied on top of the first layer. Each of those layers of product cannot perform its best without a clean foundation.
It won't be smooth if a product is applied on top of dirt or grime. It will also try and break through the products causing them to chip or peel.
4. Resurfacing Cabinet Wood

Resurfacing cabinet wood is a step that isn't often taken. We have found that using a high-quality product like the isolante resurfacer, can make all the difference. This layer of product acts as a bonding primer, creating a seamless surface that enhances the adhesion of subsequent layers of paint or stain.
This product is specifically designed to penetrate the wood, filling in minor imperfections and providing a uniform base that prevents peeling and chipping over time. By applying isolante, you ensure that the final finish is not only smooth and professional-looking but also durable enough to withstand daily wear and tear.
After this product is sprayed onto cabinet doors and drawer fronts, it should be brushed into the grain to make sure it gets every corner.
5. Priming Cabinets Before Painting

Priming cabinet doors is a pivotal step in the refinishing process, ensuring a flawless and enduring finish. Depending on the final paint color, a white or grey primer is selected to provide the best base for the topcoat.
We apply two coats of primer, with light sanding or buffing between each layer to ensure smoothness and optimal adhesion. This attention to detail helps eliminate any surface imperfections and prepares the cabinets for the final paint application. Additionally, this stage is an ideal time to use spackle putty to fill in any pinholes or marks, ensuring a seamless and professional appearance. By taking these steps, you lay the groundwork for a stunning and durable cabinet finish that will stand the test of time.
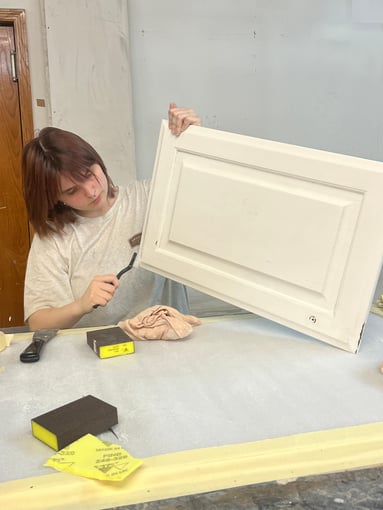
6. Sanding Cabinets

Sanding is another crucial step that must be done, in order to have lasting results. This process involves using sanding blocks or electric sanders to gently smooth the surface of the cabinets, removing any imperfections or old finishes that might hinder the application of new products. The primary purpose of sanding is to create a roughened surface that allows for better adhesion of the new layer, whether it be primer, paint, or stain, to the previous one. This ensures that the new finish will bond effectively, resulting in a smooth, durable, and long-lasting appearance.
Sanding can be a tricky and meticulous step, requiring a keen eye for detail and a steady hand. It’s important to have an experienced finisher or a reputable company complete this task, as improper sanding can lead to uneven surfaces, scratches, or even damage to the wood.
Professionals understand the nuances of different wood types and finishes, and they know how to adjust their techniques accordingly to achieve the best results. They also have access to specialized tools and equipment that can make the sanding process more efficient and effective, ensuring that your cabinets are perfectly prepped for the next stages of refinishing.
Sanding Between Each Layer
Lightly sanding or buffing between each layer of product is a crucial step in the cabinet refinishing process that should not be overlooked. This involves carefully sanding after the application of the primer and again after each subsequent coat of paint or stain.
By doing so, you ensure that each layer adheres properly to the one beneath it, creating a smooth and even surface. This step helps to eliminate any minor imperfections or dust particles that may have settled on the surface, which can affect the final appearance.
Additionally, sanding between layers enhances the durability and longevity of the finish, ensuring that your cabinets maintain their pristine look for years to come. It requires patience and attention to detail, but the results are well worth the effort, as it contributes significantly to the overall quality and professional appearance of the refinished cabinets.
Painting Cabinets in Omaha, NE
These 5 steps to thorough cabinet refinishing prep work is only half of the job. Correctly applying the high-quality, durable product on top of the base is the icing on the cake.
While comparing quotes for cabinet refinishing and finding the best contractor, you will want to ask about their prep work process. Having a detailed prep work process or not, will make or break the results in the long run.
Initially, the results might look up to your standards, but in a matter of months, if the work wasn’t done properly, the products will fail.
Ensure a quality cabinet refinishing job and thorough prep work process with one of Omaha’s most trusted painting companies, Brush & Roll Painting. We take pride in and enjoy working through our detailed process, to obtain lasting results for our customers.


-May-22-2026-01-56-32-9736-PM.png?width=800&height=418&name=Blog%20Post%20Image%20Size%20(1)-May-22-2026-01-56-32-9736-PM.png)


-May-15-2026-04-54-24-9954-PM.png?width=800&height=418&name=Blog%20Post%20Image%20Size%20(1)-May-15-2026-04-54-24-9954-PM.png)
-Sep-20-2024-01-43-26-0356-PM.png?width=800&height=418&name=Blog%20Post%20Image%20Size%20(2)-Sep-20-2024-01-43-26-0356-PM.png)


