
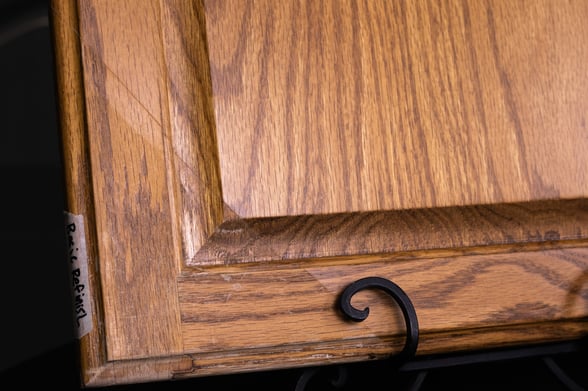
If your cabinets are older, detailed, or have a raised frame around the door, you may be worried about how they will turn out after painting. Many homeowners notice small grooves, lips, or layered edges on cabinet doors and frames, and wonder if paint will stick there. Others worry the finish will look uneven, thicker in some spots, thinner in others, or rough in the corners where sanding seems hard to reach.
These concerns are valid. Cabinet doors are not flat walls. They have profiles, seams, and edges that can cause problems if sanding is rushed or skipped.
Brush & Roll Painting has worked in Omaha homes since 1996. Over the years, we have painted cabinets from every decade, including older oak cabinets with deep grooves, beveled edges, and layered frames. We have seen what happens when sanding is not done correctly, and we have also seen how careful prep work changes the final result.
Our role here is not to sell, but to explain how professional cabinet painters address these problem areas so you can understand what to look for when hiring a cabinet painter.
By the end of this guide, you will understand how painters sand grooves and edges on cabinet doors, why it matters for adhesion and appearance, and how a proper sanding process works step by step. You will also learn what questions to ask a painter and how sanding fits into a professional cabinet refinishing process using modern products like 2K polyurethane.
Watch "How To Paint Cabinets with a 2K Poly" to see the process come to life.
Why do cabinet doors have grooves, lips, and layered edges?
Many cabinets, especially older ones, are built with framed doors that include raised panels, routed edges, and small recessed areas that create texture and depth.
Cabinet doors are often made with multiple parts. There is usually an outer frame, an inner panel, and sometimes decorative routing along the edge. Older cabinets often have a noticeable lip where the frame meets the panel. These shapes were designed for strength and style, not for easy repainting.
Common examples homeowners see include:
• Raised panel doors with a recessed center
• Grooved edges where the frame meets the panel
• Rounded or beveled edges
• Small inside corners that catch dust and grease
These features are exactly where sanding matters most.
Why is sanding grooves and edges so important when painting cabinets?
Paint and primer need a clean, lightly rough surface to stick properly, and grooves and edges are where failure usually starts if sanding is skipped.
Paint does not bond well to slick, dirty, or glossy surfaces. Grooves and edges tend to hold more grease, cooking residue, and cleaning product buildup than flat areas. If these areas are not sanded properly, paint can chip, peel, or wear unevenly over time.
Sanding grooves and edges helps:
• Remove built-up residue
• Create texture for adhesion
• Prevent peeling along edges
• Keep the finish looking even
This step protects both the look and lifespan of the cabinets.
Can painters sand inside small grooves and detailed edges?
Yes, but only if they use the right tools, time, and process. Proper sanding is not rushed, and it is done in stages.
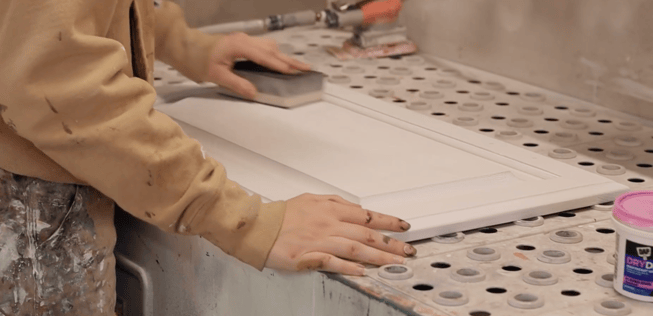
Sanding cabinet doors is not a single step. It is a sequence of cleaning, sanding, coating, and sanding again. Professionals use a mix of hand sanding, soft sanding sponges, and fine grit paper to reach detailed areas without damaging the profile of the door.
Painters do not try to flatten grooves or remove details. The goal is to lightly scuff every surface so the coatings can bond evenly.

What does a professional cabinet sanding process look like?
A proper process includes cleaning, wet sanding, dry sanding, and sanding between each coat of primer and finish.
Here is how a professional cabinet painting process typically handles sanding, especially on detailed doors.

Step 1: deep cleaning before sanding
Before sanding starts, cabinets are thoroughly cleaned. This step removes grease, oils, and residue that sanding alone cannot fix.
Common cleaning focuses include:
• Around handles and knobs
• Inside grooves and corners
• Near stoves and dishwashers
• Door edges and frames
Skipping this step can cause sanding to smear grease instead of removing it.
Step 2: wet sanding for controlled abrasion
Wet sanding uses fine-grit sandpaper with moisture. This helps reduce dust and allows the painter to gently scuff detailed areas without gouging the surface.
Wet sanding is especially useful for:
• Grooves and raised edges
• Rounded profiles
• Areas with old finish buildup
This step smooths the surface while keeping details intact.
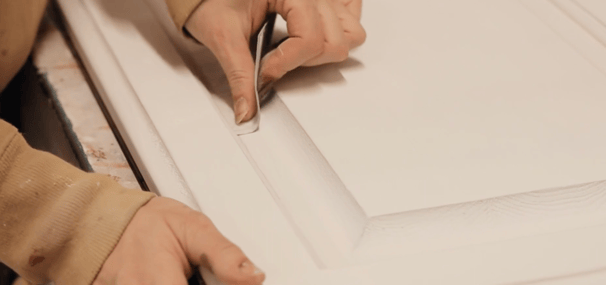
Step 3: dry sanding in between each layer
Dry sanding helps even out the surface and prepare it for the next coat. Painters use fine grit paper and sanding sponges that conform to curves and corners.
Dry sanding ensures:
• No shiny spots remain
• Edges feel smooth, not sharp
• The surface feels consistent by touch
Why do painters sand between coats of primer and paint?
Sanding between coats removes dust, smooths texture, and helps each layer bond to the next.
Cabinet painting is not about applying thick coats. Thin, controlled layers perform better. After primer dries, painters sand again, including inside grooves and along edges.
Sanding between coats helps:
• Knock down raised grain
• Remove small debris
• Improve smoothness
• Create a professional finish
This process repeats after each major coating stage.
How does sanding work with a 2K polyurethane cabinet finish?
Sanding is even more important when using a 2K polyurethane because the product is hard, durable, and unforgiving once cured.
2K polyurethane is a two-part system that cures into a tough finish. It is commonly used on cabinets because it resists scratches, moisture, and wear. However, it relies heavily on proper surface prep.
With this type of product:
• Adhesion depends on sanding quality
• Mistakes cannot be hidden easily
• Surface texture shows more clearly
That is why sanding grooves and edges correctly before and between coats matters so much.
Will sanding remove the detail from my cabinet doors?
No, not when done correctly. Professional sanding scuffs the surface without flattening or reshaping the door.
Painters are not trying to erase the character of your cabinets. The goal is to preserve the shape while making it paint-ready. Heavy sanding that removes detail is usually a sign of inexperience or rushing.
Proper sanding keeps:
• Routed edges crisp
• Panels defined
• Grooves visible but smooth
This balance is part of skilled prep work.
What happens if grooves and edges are not sanded properly?
Paint failure usually starts in these areas first. When sanding is skipped or rushed, homeowners may see:
• Chipping along edges
• Peeling in corners
• Uneven sheen in grooves
• Rough texture near profiles
These issues may not appear right away, but they often show up within the first year.
What questions should homeowners ask a cabinet painter about sanding?
Asking specific prep questions helps you understand the quality of the process, not just the price.
Helpful questions include:
• How do you sand detailed cabinet doors?
• Do you sand between coats of primer and finish?
• What products are you using, and why?
Clear answers show experience and transparency.
Frequently Asked Questions About Sanding Cabinet Grooves and Edges
Do all cabinet doors need the same sanding process?
No. Flat slab doors require less detailed sanding than raised panel or routed doors. Older cabinets with layered frames usually need more time and care.
Can sanding be skipped if the cabinets look clean?
No. Even clean-looking cabinets still need sanding for adhesion. Paint sticks to texture, not just cleanliness.
Is hand sanding better than machine sanding for grooves?
Yes. Hand sanding and sanding sponges allow painters to reach tight areas without damaging details.
Does sanding make cabinets dusty inside the house?
Professional processes include dust control, cleaning steps, and proper containment to keep the home clean during the project. If painters are using electric sanders, they should have vacuum attachments to help catch the dust.
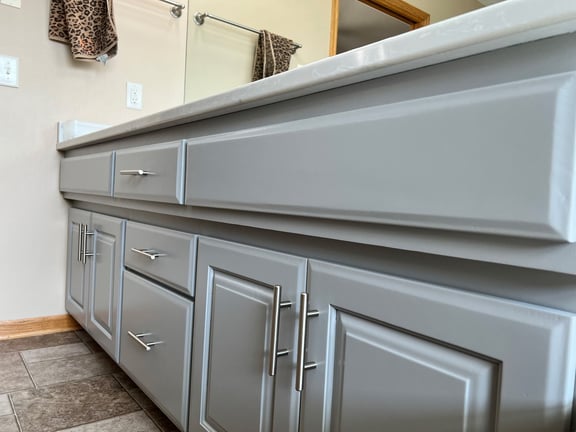
Kitchen Cabinet Painting in Omaha, NE
Many Omaha homes have cabinets built decades ago with beautiful but complex details. Painting them successfully depends on prep work, especially sanding grooves and edges where problems usually begin.
This guide has shown how proper cleaning, wet sanding, dry sanding, and sanding between coats create a smooth, long-lasting finish, even on detailed cabinet doors. Understanding this process helps homeowners know what to expect and what to ask when hiring a painter.
Brush & Roll Painting has served Omaha homeowners since 1996, helping guide them through cabinet painting decisions with clear information and realistic expectations.
If you are ready to move forward, click the button below to get a quote.

If you are still planning your project and want to understand pricing first, visit the cabinet painting pricing calculator to explore the cost at your own pace.


-May-22-2026-01-56-32-9736-PM.png?width=800&height=418&name=Blog%20Post%20Image%20Size%20(1)-May-22-2026-01-56-32-9736-PM.png)


-May-15-2026-04-54-24-9954-PM.png?width=800&height=418&name=Blog%20Post%20Image%20Size%20(1)-May-15-2026-04-54-24-9954-PM.png)
-Sep-20-2024-01-43-26-0356-PM.png?width=800&height=418&name=Blog%20Post%20Image%20Size%20(2)-Sep-20-2024-01-43-26-0356-PM.png)


